Easy Peanut Butter Cup Fudge: The Ultimate No-Bake Chocolate & Peanut Butter Treat
Indulge in the perfect harmony of rich chocolate and creamy peanut butter with this incredibly quick and easy microwave fudge. This delightful treat is guaranteed to be a crowd-pleaser, disappearing almost as fast as you can make it!
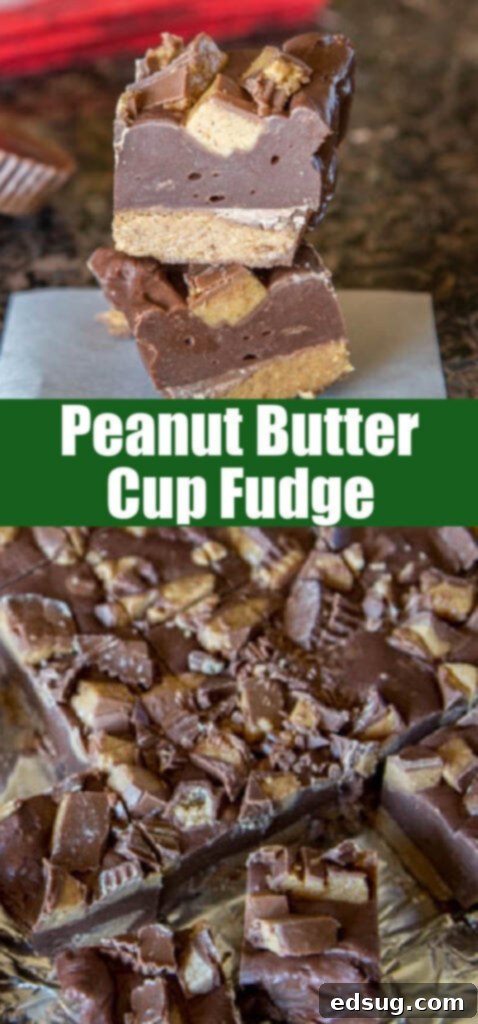
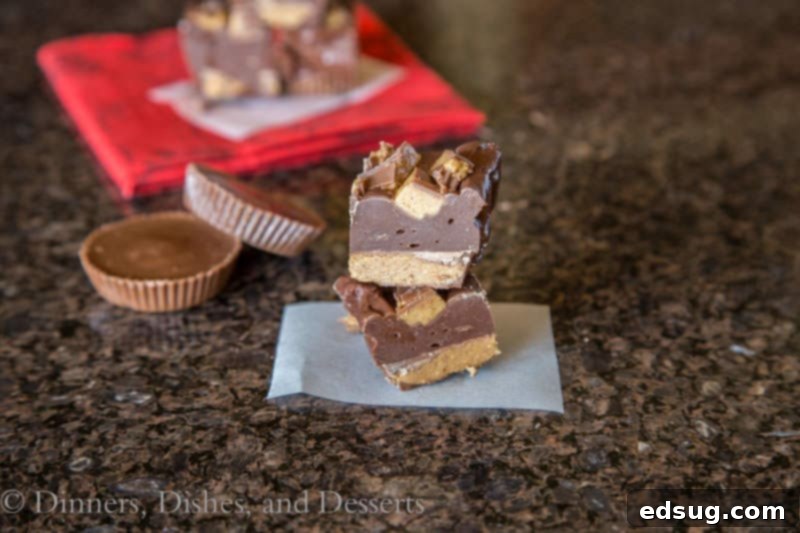
There’s simply no denying the timeless appeal of chocolate and peanut butter. It’s a flavor combination that captures hearts and satisfies sweet cravings like no other. While classic Reese’s Fudge holds a special place in many hearts for its wonderfully creamy texture and iconic taste, this Peanut Butter Cup Fudge offers a distinct and equally delicious experience. What makes this recipe truly stand out is its decadent base layer of actual chocolate fudge, perfectly complemented by those beloved peanut butter cups. It’s a symphony of textures and flavors that will have everyone reaching for more!
The best part? This luscious fudge comes together in a flash. Whether you prefer the convenience of your microwave or the steady heat of a stovetop, this recipe is designed for speed and simplicity, making it an ideal choice for last-minute desserts, holiday platters, or simply whenever a fudge craving strikes. Forget complicated candy thermometers and endless stirring; this is gourmet taste with minimal effort!
Why You’ll Adore This Easy Fudge Recipe
- **Effortless Preparation:** Unlike traditional Chocolate Fudge, which often demands precise sugar boiling temperatures and constant attention, this recipe eliminates all that fuss. You won’t need to babysit a pot or worry about reaching the “soft ball” stage. This makes it a foolproof option even for beginner bakers, ensuring perfect results every time.
- **Ultimate Convenience:** With options to melt your chocolate mixture either in the microwave or on the stovetop, this recipe adapts to your kitchen and your schedule. The melting process is virtually the only active cooking step, allowing you to create impressive fudge with minimal hands-on time. It’s perfect for busy days or when you need a quick dessert.
- **Perfect for Planning Ahead:** This fudge is a dream for meal preppers and holiday hosts. You can easily make it a few days in advance and store it in the fridge, or even freeze it for up to several months. This flexibility makes it an excellent candidate for adding to cookie tins, preparing for holiday gatherings, or having a delicious treat on hand whenever company arrives.
- **Irresistible Flavor Combination:** The classic pairing of rich chocolate and creamy peanut butter is elevated further with the addition of actual peanut butter cups within the fudge. Each bite offers a delightful texture and a burst of the beloved flavor duo.
- **Simple Ingredients:** You’ll be amazed at how much flavor and joy just a few staple ingredients can bring. No obscure items or specialty stores needed, making this recipe accessible to everyone.
Essential Ingredients for Peanut Butter Cup Fudge
You’ll be delighted to know that this incredibly rich and satisfying peanut butter cup fudge requires only a handful of readily available ingredients. Simplicity is key to this recipe’s charm and ease!
- **Peanut Butter Cups:** The star of the show! Use your favorite brand and size. We’ll be using some whole and some crushed for a delightful textural contrast.
- **Semi-Sweet Chocolate Chips:** These provide the foundational rich chocolate flavor. Semi-sweet is ideal for balancing the sweetness of the condensed milk and peanut butter.
- **Sweetened Condensed Milk:** The magic ingredient that creates the creamy, melt-in-your-mouth fudge consistency without any boiling or special techniques.
- **Vanilla Extract:** A touch of vanilla enhances all the other flavors, adding depth and warmth to the overall profile.
That’s right, just these four core ingredients (plus a few extra peanut butter cups for crushing!) are all you need to whip up this show-stopping peanut butter cup fudge!
Step-by-Step Guide to Making Peanut Butter Cup Fudge
Creating this irresistible fudge is incredibly straightforward. Follow these simple steps for a perfect batch every time:
- **Prepare Your Pan:** To ensure easy removal and clean cuts, begin by lining an 8 or 9-inch baking pan with parchment paper or foil. Leave an overhang on the sides – these will act as handles later. Once lined, arrange the whole, unwrapped peanut butter cups in an even layer across the bottom of the pan. For an 8×8 inch pan, this usually means 4 rows of 4 cups.
- **Melt the Chocolate Mixture:** In a medium saucepan, combine the semi-sweet chocolate chips and sweetened condensed milk. Heat over low heat, stirring continuously until the chocolate is completely melted and the mixture is smooth and glossy. Alternatively, for a microwave method, combine the ingredients in a microwave-safe bowl and heat at 50% power, stirring every 45 seconds, until fully melted and smooth. Once melted, remove from heat and stir in the vanilla extract until well combined.
- **Assemble the Fudge Layers:** Carefully pour the warm, melted chocolate mixture evenly over the peanut butter cups already arranged in your prepared baking dish. Use a spatula to gently spread it to the edges, ensuring all the cups are covered.
- **Add Crushed Topping:** Immediately after pouring the chocolate, sprinkle your crushed peanut butter cups over the top. Gently press them down into the chocolate layer. You’ll want to work fairly quickly here, as this fudge sets up rather fast. The crushed cups add both a lovely texture and an extra burst of peanut butter flavor.
- **Cool and Set:** Allow the fudge to cool completely at room temperature for at least 1-2 hours, or until firm. For a quicker set, you can refrigerate it for about 30-60 minutes. Once fully set, use the parchment paper or foil overhang to lift the entire block of fudge out of the pan. Slice it into desired squares (typically 1-inch pieces) and prepare to enjoy!
Expert Tips for Perfect Fudge Every Time
- **Choose Your Chocolate Wisely:** We highly recommend sticking with semi-sweet chocolate chips as specified in the recipe. The sweetness of the condensed milk perfectly balances the slight bitterness of semi-sweet chocolate, creating a rich, well-rounded flavor. While you could opt for darker chocolate for a more intense cocoa flavor, be mindful that it might result in a less sweet fudge. Conversely, we strongly advise against using milk chocolate, as the combination with sweetened condensed milk would make the fudge excessively sweet. White chocolate is another option you might see, but it too can lead to an overly sweet and less traditional fudge experience.
- **The Power of Parchment Paper:** For effortless removal and beautifully neat slices, always line your baking pan with parchment paper or foil, ensuring you leave a generous overhang on the sides. This simple step allows you to easily lift the entire slab of fudge out of the pan once it’s set, making slicing a breeze and keeping the bottom layer of peanut butter cups perfectly intact. It truly makes serving and cleanup so much simpler!
- **Storage and Shelf Life:**
- **Room Temperature:** Store your peanut butter cup fudge in an airtight container at room temperature for up to 3-4 days. While delicious, it won’t last as long as in the fridge.
- **Refrigerator:** To extend its freshness, store the fudge in an airtight container in the refrigerator. It will stay wonderfully fresh for an additional few days, often up to a week.
- **Freezer:** For long-term storage, this fudge freezes beautifully! Wrap individual pieces tightly in plastic wrap, then place them in a freezer-safe airtight container or freezer bag. It can be frozen for 2-3 months. Thaw frozen fudge at room temperature for about 30 minutes before serving.
- **Clean Cuts Every Time:** For perfectly neat squares, especially when the fudge is firm, use a sharp knife that has been run under hot water and then wiped dry. Reheat and wipe the knife after every few cuts to prevent sticking and ensure smooth, clean lines.
- **Customization and Variations:** Feel free to get creative!
- **Extra Crunch:** Add a handful of chopped peanuts or other nuts into the chocolate mixture before pouring, or sprinkle them on top with the crushed peanut butter cups.
- **Festive Fun:** Incorporate sprinkles on top for holidays or special occasions.
- **Different Candies:** Experiment with other chopped candies if you’re feeling adventurous, though the peanut butter cup combination is truly classic.
- **Mini Marvels:** Instead of full-sized peanut butter cups, use mini peanut butter cups for a slightly different look and bite-sized experience.

More Irresistible Dessert Recipes to Explore
If you’re a fan of delightful sweets, especially those featuring chocolate, peanut butter, or both, you’ll love these other fantastic recipes from our collection:
- Chocolate Peanut Butter Balls
- Bailey’s Chocolate Cheesecake
- Chocolate Hazelnut Cake
- Slow Cooker Peanut Clusters
- Nutella Brownies
- Easy Microwave Fudge
- Caramel Cashew Clusters
- Cream Cheese Spritz Cookies

Peanut Butter Cup Fudge
Pin Recipe
Rate Recipe
Print Recipe
Ingredients
- 16 peanut butter cups, unwrapped
- 3 cups semi-sweet chocolate chips
- 1 can, (14 oz) sweetened condensed milk
- 1 teaspoon vanilla extract
- 1/2 cup peanut butter cup, crushed
Instructions
-
Line a 9 inch baking pan with foil or parchment paper, leaving an overhang on the sides for easy lifting.
-
Lay unwrapped peanut butter cups across the bottom of the pan in an even layer (typically 4 rows of 4 for a 9-inch pan).
-
In a saucepan over low heat, gently melt together the chocolate chips and condensed milk, stirring until completely smooth. Remove from heat, then stir in the vanilla extract. (Alternatively, melt in the microwave at 50% power, stirring every 45 seconds).
-
Pour the warm chocolate mixture evenly over the peanut butter cups in the prepared pan, spreading gently to cover.
-
Sprinkle the crushed peanut butter cups over the chocolate layer, lightly pressing them down. Work quickly as the fudge will begin to set.
-
Allow the fudge to cool completely at room temperature until firm before slicing into squares to serve.
-
Store any leftover fudge in an airtight container at room temperature or in the refrigerator.
Notes
Nutrition
Nutrition information is automatically calculated and should only be used as an approximation. Always consult a qualified professional for precise dietary advice.
Additional Recipe Information
Love this simple fudge recipe? Leave a comment below!Your feedback helps others discover delicious treats!
I’ve recently launched a fantastic new community on Facebook, and I would absolutely love for you to join us! It’s a vibrant space where you can connect with other food enthusiasts, share your own cherished recipes, ask cooking questions, and stay completely up-to-date with all the latest happenings and new recipes from Dinners, Dishes and Desserts (so you’ll never miss a delicious post!).
Make sure to follow me on Instagram and
tag #dinnersdishes so I can see all the wonderful DINNERS, DISHES, AND DESSERTS
recipes YOU create!
Don’t miss out on any of my delicious content! Be sure to follow me on my social media channels to stay connected and discover new recipes and culinary inspiration:
Facebook | Twitter | Pinterest | Instagram
