Easy Ham and Cheese Roll Ups: The Perfect No-Bake Appetizer & Lunchbox Treat
Discover how to make creamy, cheesy, and flavor-packed Ham and Cheese Roll Ups – a super easy appetizer, quick snack, or even a clever lunchbox idea that everyone, especially kids, will absolutely love!
There’s something undeniably satisfying about a great appetizer. For my family, a spread of delicious finger foods can often become the main event! While classic dips always have their place at parties and gatherings, sometimes you need something more substantial – a little handheld bite that’s both filling and bursting with flavor. That’s precisely where these incredible Ham and Cheese Roll Ups truly shine. They are the epitome of effortless entertaining and smart meal prep.
These savory pinwheels are a delightful combination of creamy cheese, savory deli ham, and a hint of zesty ranch. They offer an irresistible taste and texture that makes them an instant hit, guaranteed to vanish from any platter in record time. Whether you call them roll-ups, pinwheels, or simply delicious ham and cheese bites, their versatility and ease make them a must-try recipe for any occasion.
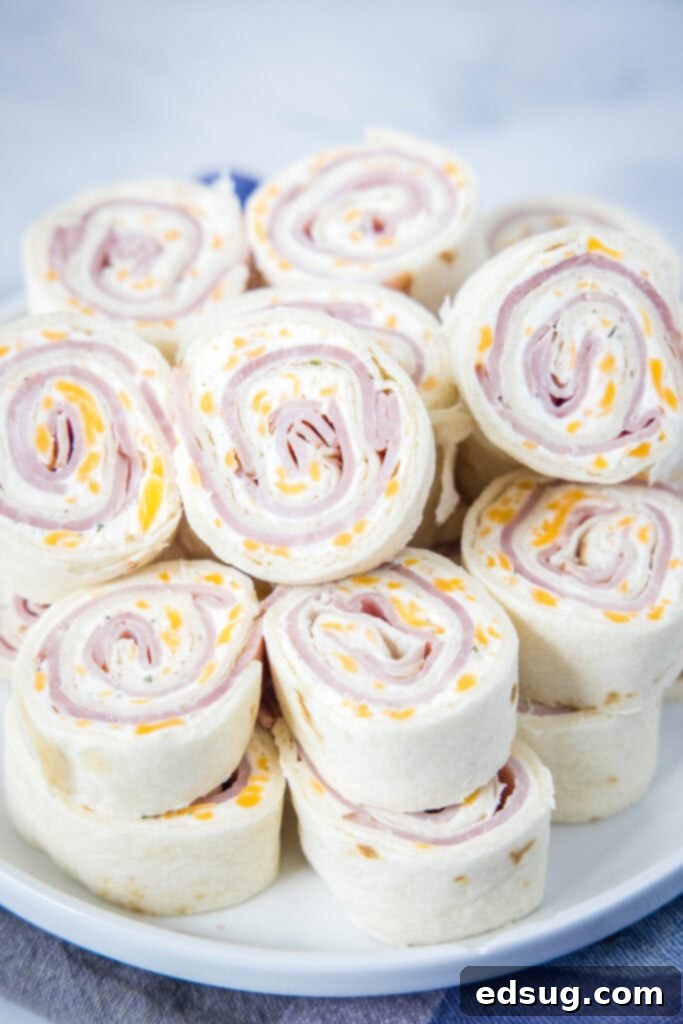
Why These Ham and Cheese Roll Ups Will Become Your Go-To Recipe
These aren’t just any ordinary snacks; they are a versatile culinary chameleon! Whether you’re planning an elegant party spread, packing a healthy school lunch, or simply need a quick, no-cook snack, these ham and cheese pinwheels fit the bill perfectly. Here’s why you’ll absolutely love adding them to your repertoire:
- Effortlessly Easy: With minimal ingredients and absolutely no cooking required, these roll ups come together in mere minutes. They are perfect for last-minute gatherings or busy weeknights.
- Universally Appealing: A guaranteed hit with both adults and children, thanks to their universally loved combination of creamy, savory, and cheesy flavors. They’re a true crowd-pleaser!
- Fantastic for Meal Prep: Prepare a batch at the beginning of the week, and you have instant lunches or snacks ready to slice and serve each day. This saves valuable time during hectic mornings.
- Kid-Friendly & Fun: An excellent alternative for picky eaters or kids who are tired of traditional sandwiches. The fun pinwheel shape and creamy texture make them highly appealing and a great way to encourage healthy eating.
- Highly Customizable: These roll ups are a blank canvas! Easily adapt them to different tastes, dietary preferences, or whatever ingredients you have on hand (as we’ll explore in the variations section).
- No-Bake & Make-Ahead Perfection: Ideal for busy schedules or when you need an appetizer that won’t take up precious oven space or require complex steps. They actually taste better after chilling!
The Simple Ingredients You’ll Need
One of the beauties of this recipe lies in its reliance on simple, readily available ingredients. You might even have most of these in your pantry and fridge right now!
- Cream Cheese: The essential base for our rich, creamy filling.
- Sour Cream (Optional): A delightful addition for tang and spreadability.
- Ranch Dressing Mix: The secret ingredient that infuses the roll-ups with a savory, herbaceous kick.
- Cheddar Cheese: Shredded cheddar provides that classic cheesy goodness and texture.
- Deli Ham: Thinly sliced ham is ideal for easy rolling and even flavor distribution.
- Large Flour Tortillas: The perfect pliable vessel for holding all our delicious fillings.
Ingredient Deep Dive & Expert Tips for the Best Ham and Cheese Pinwheels
Understanding each component can elevate your roll-up game and ensure perfect results every time:
- Cream Cheese: Softened is Absolutely Crucial! For a smooth, lump-free filling that spreads effortlessly, it’s paramount that your cream cheese is at room temperature. Forgetting this step can lead to a frustrating experience with clumpy filling. Take it out of the fridge at least 30-60 minutes before you plan to start mixing. If you’re pressed for time, you can carefully microwave it for 10-15 seconds, but be cautious not to melt it completely. Full-fat cream cheese generally offers the richest flavor and creamiest texture, but a light or reduced-fat version can also be used if preferred.
- Ranch Dressing Mix: The Flavor Powerhouse. This powdered mix is where a significant portion of the roll-ups’ savory, herbaceous flavor comes from. I personally love using my Homemade Ranch Dressing Mix, as I often have a fresh batch on hand. It’s easy to make and provides a superior flavor. However, a store-bought packet of dry ranch seasoning works perfectly fine and is incredibly convenient! Any brand you prefer will deliver that signature zesty ranch taste that complements the ham and cheese so well.
- Sour Cream: Enhancing Texture and Taste. While the recipe lists sour cream as optional, I genuinely find that it makes a significant difference. It not only helps the cream cheese mixture achieve an incredibly smooth and easy-to-spread consistency but also introduces a subtle, refreshing tanginess. This extra flavor dimension makes the pinwheels just a little bit different and more complex. If you decide not to use sour cream, the recipe will still work, but you might find the filling slightly thicker. A tiny splash of milk or even plain Greek yogurt (for a healthier, tangier twist) could be used to thin the mixture if needed, but be mindful that the flavor profile will shift.
- Cheddar Cheese: Shredded for Seamless Integration. Shredded cheddar cheese blends seamlessly into the cream cheese mixture, ensuring cheesy goodness in every single bite. While pre-shredded cheese is a time-saver, grating your own from a block often provides a fresher taste and avoids the anti-caking agents found in some packaged shredded cheeses. You can use mild, medium, or sharp cheddar depending on your flavor preference.
- Deli Ham: Choose Wisely. The quality and thickness of your deli ham can impact the final product. Opt for a good quality, thinly sliced deli ham. The thinness is crucial for ensuring the rolls are easy to roll tightly and slice neatly into pinwheels. Avoid overly thick slices, which can make the roll-ups bulky and harder to manage. Feel free to experiment with different types of ham, such as honey-roasted, smoked, or even black forest ham, to introduce varying flavor notes.
- Large Flour Tortillas: The Ideal Wrapper. Large flour tortillas are the best choice for these roll-ups. They provide ample surface area for the filling, allowing you to create substantial rolls that yield more slices. Their flexibility also makes them easy to roll without cracking. While smaller tortillas can be used for mini roll-ups, adjust the filling amount accordingly. You can also explore whole wheat tortillas for a slightly different texture and added fiber.
How To Make Ham and Cheese Roll Ups: A Detailed Step-by-Step Guide
Making these ham and cheese pinwheels is incredibly straightforward and requires minimal effort. Follow these simple steps for perfectly assembled, delicious results every time!
- Prepare the Creamy Filling: In a medium-sized mixing bowl, combine your properly softened cream cheese, the optional sour cream, and the ranch dressing mix. Use a sturdy spoon or a rubber spatula to mix vigorously until all ingredients are thoroughly blended and the mixture is completely smooth and free of any lumps. The consistency should be soft, creamy, and easily spreadable.
- Fold in the Cheddar Cheese: Add the shredded cheddar cheese to the cream cheese mixture. Gently fold it in using your spatula until the cheese is evenly distributed throughout the entire filling. Avoid overmixing once the cheese is incorporated to maintain its texture.
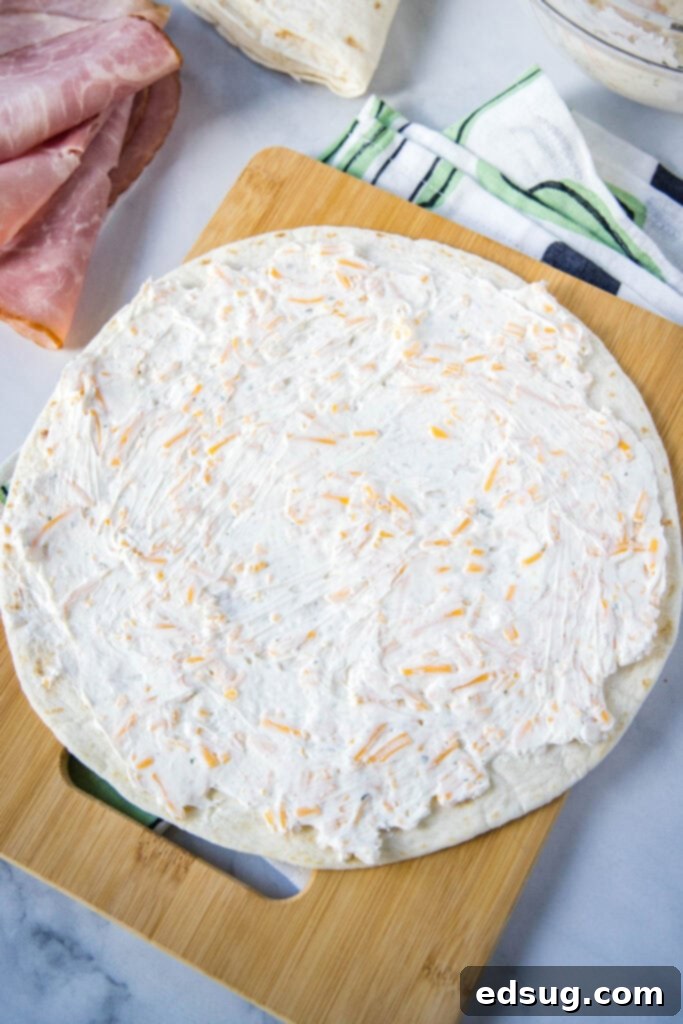
- Spread on Tortillas Evenly: Lay your large flour tortillas flat on a clean cutting board or a spacious work surface. Divide the cream cheese mixture evenly among the tortillas. Using an offset spatula, the back of a spoon, or a butter knife, spread the filling smoothly and uniformly over the entire surface of each tortilla. Make sure to extend the filling all the way to the very edges – this critical step helps to create a “seal” and ensures the roll-ups stay together when sliced.
- Layer the Ham: Carefully arrange the thinly sliced deli ham over the cream cheese mixture. Place it in a single, even layer, making sure to cover most of the cheesy spread. A slight overlap of the ham slices is fine, but try to avoid creating thick clumps, as this can make the rolling process more challenging.
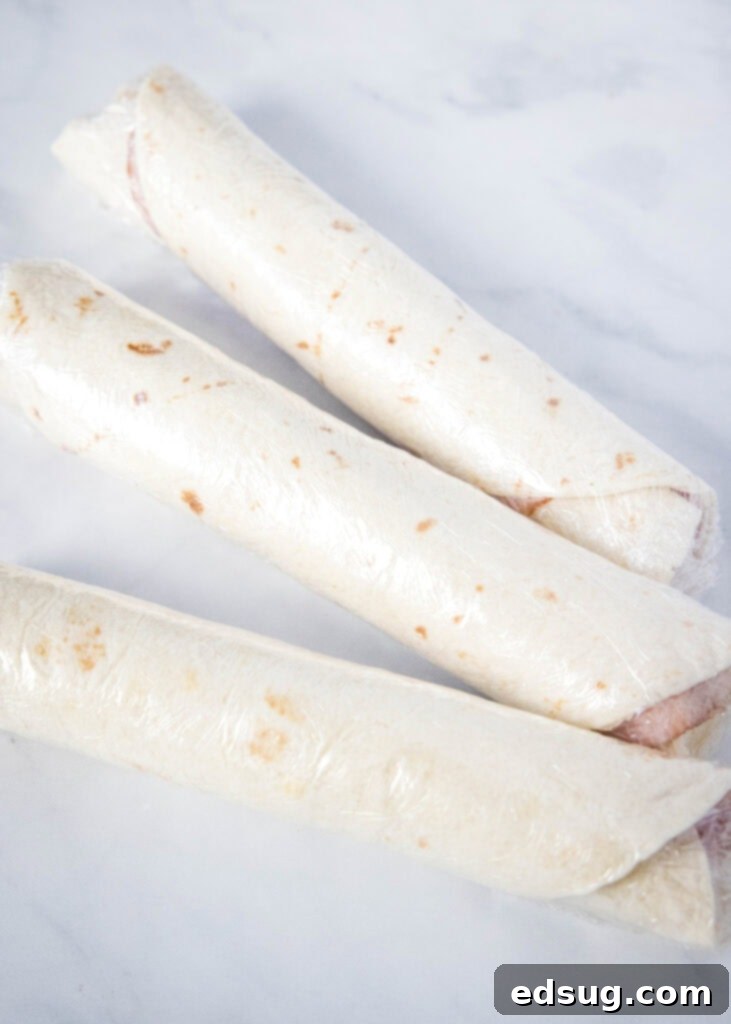
- Roll Up Tightly and Wrap: Starting from one edge of each tortilla, carefully and tightly roll it up into a firm cylinder. The tighter you roll, the more secure your pinwheels will be, and the neater they will look once sliced. After rolling, wrap each tortilla cylinder snugly in plastic wrap. This step is essential; it helps the rolls hold their perfect cylindrical shape and prevents them from drying out while chilling in the refrigerator.
- Chill for Perfection: Place the tightly wrapped tortilla rolls in the refrigerator for at least one hour. Chilling is a vital, non-negotiable step for this recipe! It allows the cream cheese mixture to firm up considerably, which in turn makes the roll-ups much easier to slice into neat, distinct pinwheels without any squishing, smudging, or falling apart. You can prepare these rolls up to 4 days in advance and keep them chilled, making them an excellent make-ahead option for entertaining or meal prep!
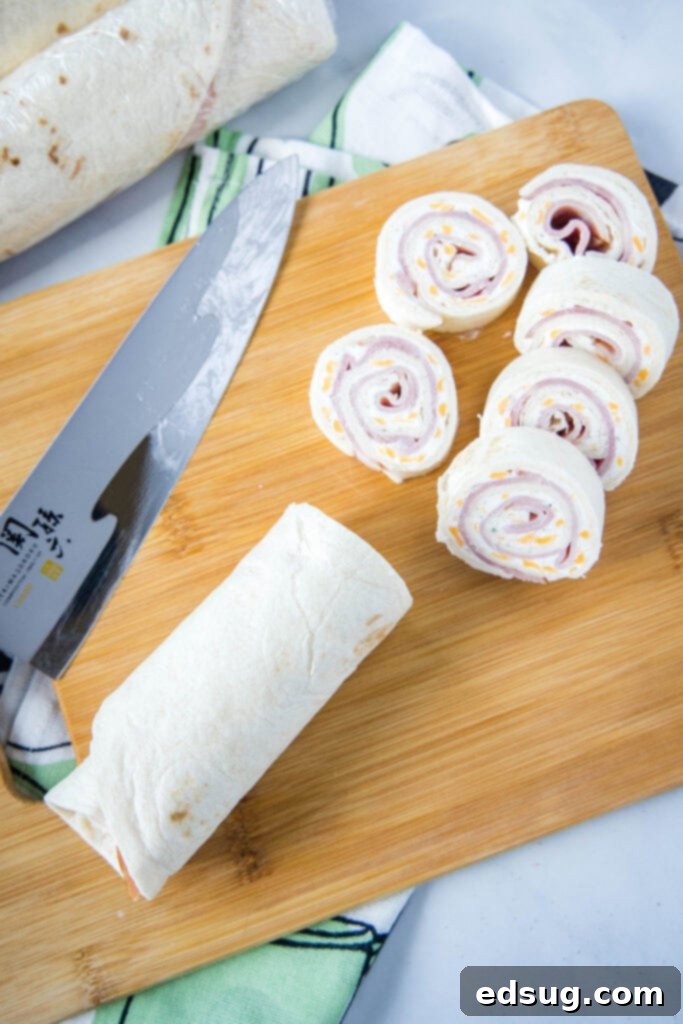
- Slice and Serve: When you’re ready to enjoy these delightful treats, remove the chilled rolls from the fridge and unwrap them from the plastic. Using a very sharp knife, carefully slice each roll into approximately 1/2-inch thick pieces. Arrange the vibrant pinwheels attractively on a platter and serve them immediately.
Recipe Variations and Expert Tips for Ultimate Customization
While the classic ham and cheese roll up is fantastic on its own, this recipe is truly a blank canvas for your culinary creativity! Here are some ideas to mix things up and ensure perfect results every time:
- Softened Cream Cheese is Non-Negotiable: We’ve stressed this already, but it bears repeating because it’s the most critical step. Starting with properly softened cream cheese is the absolute key to achieving a smooth, evenly blended filling that spreads effortlessly over your tortillas. If it’s too cold, you’ll end up with lumps and an uneven, frustrating application.
- Don’t Skip the Chill Time: Patience truly is a virtue here! Allowing the rolls to chill in the fridge for at least an hour (and even better, overnight) is essential for success. This firms up the cream cheese mixture, ensuring your roll-ups hold together beautifully when sliced and don’t fall apart or get messy. The chilling also gives the flavors ample time to meld and deepen, resulting in a more harmonious taste.
- Mix Up the Meat: Ham is a timeless choice, but don’t limit yourself! Experiment with other thinly sliced deli meats like roast beef, turkey breast, smoked chicken, or even pepperoni for a different flavor profile. A combination of meats, like turkey and ham, can also be a delicious twist!
- Change Up the Cheese: While cheddar is a crowd-pleaser, the cheese possibilities are endless. Try using Mozzarella for a milder, stretchier texture, Provolone for a slightly sharper taste, or Pepper Jack if you enjoy a little spicy kick. Swiss, Colby Jack, or even a smoked gouda would also be fantastic. You can stick with shredded cheese mixed into the filling, or for an extra cheesy layer, place slices of cheese directly over the ham before rolling.
- For Pickle Lovers: If you enjoy a briny, tangy kick, finely chop some dill pickles or pickle relish and mix it directly into the cream cheese filling. It adds a wonderful zest and a satisfying crunch!
- Spread the Filling to the Edge: This might seem like a small, minor detail, but it’s important for structural integrity. Spreading the cream cheese mixture all the way to the very edge of the tortilla helps to create a natural “seal” when you roll it up. This prevents the edges from unraveling, keeps the filling contained, and ensures every pinwheel has a consistent and full filling.
- Add a Veggie Boost: For added freshness, color, and nutrition, consider mixing in some finely chopped vegetables. Green onions, chives, bell peppers (red or green for a pop of color), or even a little bit of finely minced fresh spinach can be excellent additions. Just ensure any vegetables are very finely chopped so they don’t tear the tortilla during rolling or make the rolls difficult to slice.
- Spice Things Up: For those who love a little heat, a pinch of cayenne pepper, a dash of your favorite hot sauce, or a sprinkle of red pepper flakes can be added to the cream cheese mixture. Alternatively, using a spicy deli ham or pepper jack cheese will provide a similar kick.
- Herbaceous Twist: Incorporate fresh herbs like finely chopped dill, parsley, or chives into the cream cheese mixture for an elevated and vibrant fresh flavor. These bright herbs can cut through the richness of the cheese and ham beautifully.
- Make it Gluten-Free: These roll ups are incredibly easy to make gluten-free! Simply use your favorite brand of gluten-free flour tortillas. The rest of the ingredients are naturally gluten-free, making this an accessible recipe for those with dietary restrictions.

Storage and Make-Ahead Tips for Maximum Freshness
These Ham and Cheese Roll Ups are fantastic for meal prepping and entertaining, largely because they store so well. Proper storage ensures they remain fresh and delicious for days:
- Refrigeration is Key: The rolled and plastic-wrapped tortillas will last beautifully in the fridge for up to 4 days when kept in an airtight container or simply wrapped tightly in plastic wrap. Always ensure they are sealed well to prevent drying out or absorbing other fridge odors.
- For Best Freshness, Don’t Slice Ahead: I’ve consistently found that these rolls maintain their optimal freshness and texture longer if you don’t slice them until just before you’re ready to serve. If you’re preparing them for a party or event, make the rolls the day before, chill them thoroughly, and then slice them as needed to refill your platter. This method prevents the exposed edges of the pinwheels from drying out and helps them look their absolute best.
- Lunchbox Prep Efficiency: If you’re using these for lunchboxes throughout the week, you can slice a portion each morning or the night before for convenience. Store the remaining unsliced rolls, tightly wrapped, back in the fridge.
- Freezing? Not Recommended: While it might be tempting to freeze a batch for later, it’s generally not recommended for these roll ups. The cream cheese mixture can undergo an undesirable textural change when thawed, often becoming grainy or watery. Additionally, the tortillas themselves may become soggy or less appealing. For the best possible taste and texture, these are truly best enjoyed fresh or kept refrigerated for a few days.
Serving Suggestions for Any Occasion
These versatile Ham and Cheese Roll Ups can be served in a multitude of ways, adapting perfectly to different meals and occasions:
- As an Elegant Appetizer: Arrange them attractively on a platter, perhaps with a garnish of fresh parsley or finely chopped chives for a pop of color. Serve alongside other complementary finger foods like mini quiches, vegetable sticks with an extra side of ranch dip, or colorful fruit skewers. They add a touch of charm to any party spread.
- For Healthy Lunchboxes: Pack a few delightful slices alongside some fresh fruit, crunchy veggie sticks, and a small, sweet treat for a balanced, fun, and satisfying lunch that kids (and adults!) will look forward to.
- Quick and Easy Snack: When hunger strikes between meals, simply grab a few slices! They are wonderfully satisfying, packed with protein and flavor, and a much healthier alternative to many processed snacks.
- Brunch Item: Elevate your next brunch spread by including these savory roll ups alongside pastries, fresh fruit salads, and other savory bites. They offer a delightful contrast to sweeter items.
More Delicious Party Appetizer Recipes to Explore
If you loved how easy and delicious these Ham and Cheese Roll Ups are, then you’re in for a treat! My collection of party appetizers is brimming with simple, crowd-pleasing recipes that are perfect for any gathering. Be sure to check out some of these other fantastic options to expand your repertoire:
- Baked Mexican Cheese Dip: A warm, bubbly, and gooey dip that’s always a guaranteed hit at any fiesta.
- Mini Tostadas: Crispy, savory bites packed with vibrant flavors – perfect for a quick, impactful appetizer.
- Chili Cheese Dip: Hearty, robust, and incredibly cheesy, this dip is the ultimate comfort food for game day or a cozy evening.
- Baked Goat Cheese Dip: An elegant and surprisingly simple dip, featuring creamy goat cheese infused with garlic and herbs, ideal for serving with crusty bread or crackers.
- Cheesy Corn Dip: A delightful combination of sweet corn and creamy, often slightly spicy, cheesy goodness that’s highly addictive.
- Hot Crab Dip: Luxurious and indulgent, this rich, warm crab dip is a real showstopper and a guaranteed crowd-pleaser for special occasions.
- Cream Cheese Sausage Balls: Savory, cheesy, and utterly addictive, these bite-sized wonders are perfect for breakfast, brunch, or as a hearty appetizer.
- Spicy Cajun Dip: For those who love a little heat and bold flavor, this dip brings a vibrant Cajun kick to any spread.


Ham and Cheese Roll Ups
Ingredients
- 1 8oz package cream cheese, softened
- 1/4 cup sour cream, optional
- 1 Tablespoon ranch dressing mix
- 1 cup shredded cheddar cheese
- 1/2 pound thinly sliced deli ham
- 4 large flour tortillas
Instructions
- In a bowl mix together cream cheese, sour cream (if using), and ranch dressing mix until well blended.
- Stir in cheddar cheese until well combined.
- Spread cream cheese mixture evenly over the 4 tortillas, going all the way to the edge.
- Arrange the ham evenly over each tortilla.
- Roll up each tortilla tightly and wrap in plastic wrap.
- Place in the fridge for at least one hour, up to 4 days.
- Remove from the fridge and cut into about 1/2 inch sized pieces to serve.
Notes
Nutrition
Nutrition information is automatically calculated, so should only be used as an approximation.
Additional Info
Frequently Asked Questions About Ham and Cheese Roll Ups
Here are answers to some common questions you might have when making these delicious and versatile roll ups:
- Can I make these ahead of time for a party? Absolutely! These roll ups are perfect for making ahead. Prepare them fully, wrap them tightly in plastic, and store them in the refrigerator for up to 4 days. Remember to slice them just before serving for the best presentation and freshest texture.
- What kind of tortillas work best? Large, soft flour tortillas are ideal for this recipe because they are flexible, easy to roll without tearing, and provide a good surface area for ample filling. You can also use whole wheat tortillas for a slightly healthier option, but ensure they are soft and pliable.
- Can I use low-fat cream cheese or sour cream? Yes, you can certainly use low-fat or reduced-fat cream cheese and sour cream as substitutes. While full-fat versions typically offer the richest flavor and creamiest texture, the low-fat alternatives will still yield a delicious result, though the texture might be slightly lighter.
- What if my cream cheese isn’t soft enough to spread? If your cream cheese is still too firm, you can carefully microwave it in 5-10 second intervals, stirring well in between each interval, until it reaches a softened, easily spreadable consistency. Be very careful not to overheat or melt it completely, as this can change its texture.
- Are these good for kids’ lunchboxes? Yes, they are a fantastic, fun, and incredibly easy alternative to traditional sandwiches for kids. Their appealing pinwheel shape often makes them more exciting for children, and you can easily customize the fillings to suit even the pickiest eaters’ preferences.
- Can I add vegetables to the filling? Definitely! Adding finely chopped vegetables can enhance flavor, texture, and nutrition. Excellent choices include very finely minced green onions, chives, red or green bell peppers (for a pop of color), or a little bit of fresh spinach. Ensure all vegetables are minced very finely to prevent them from tearing the tortilla during rolling.
- Is it possible to freeze ham and cheese roll ups? Freezing is generally not recommended for these roll ups. The cream cheese mixture can separate or become watery upon thawing, which can negatively impact the texture and overall quality of the filling. The tortillas may also become soggy after freezing and thawing. For optimal taste and texture, these are best enjoyed fresh or kept refrigerated for a few days.
Conclusion: Your New Go-To Easy Appetizer and Snack!
These Ham and Cheese Roll Ups are truly a revelation for anyone seeking a quick, easy, and incredibly delicious appetizer or snack. Their simple ingredients, straightforward preparation, and amazing versatility make them an instant favorite for parties, lunchboxes, or even just a satisfying treat for yourself. With their creamy, cheesy filling, savory ham, and subtle ranch kick, they are guaranteed to disappear quickly from any spread, leaving everyone asking for more.
So, the next time you’re in need of a stress-free yet impressive bite that caters to all ages and tastes, remember these delightful pinwheels. They embody convenience without compromising on flavor, proving that some of the best culinary creations are also the simplest to make. Enjoy experimenting with your own variations and watch as these Ham and Cheese Roll Ups become a beloved and frequently requested staple in your home!
I created a fun group on Facebook,and I would love for you to join us! It’s a place where you can share YOUR favorite recipes, ask questions, and see what’s new at Dinners, Dishes and Desserts (so that you never miss a new recipe)!
Be sure to follow me on Instagram and tag #dinnersdishes so I can see all the wonderful DINNERS, DISHES, AND DESSERTS recipes YOU make!
Be sure to follow me on my social media, so you never miss a post!
Facebook | Twitter | Pinterest | Instagram
.
