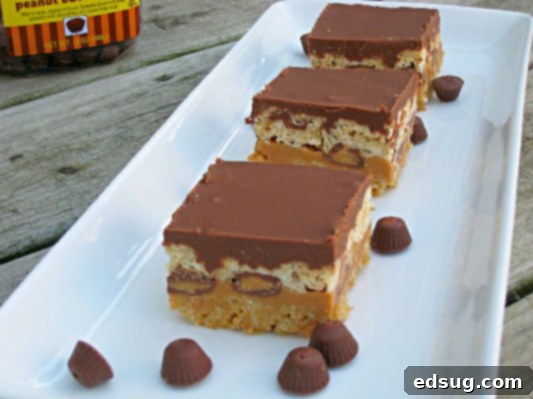
Ultimate No-Bake Peanut Butter Lover’s Rice Krispie Treats: A Layered Decadence
Did you know that November is proudly celebrated as Peanut Butter Lover’s Month? Yes, an entire month dedicated to the creamy, crunchy, irresistible delight that is peanut butter! For those of us who adore this versatile spread, it truly doesn’t get much better. Unless, of course, there was a “Peanut Butter and Chocolate Lover’s Month” – a delightful thought that might just exist given the sheer number of unique food holidays out there! As a passionate devotee of all things peanut butter, I simply couldn’t let this special month pass without sharing a truly exceptional recipe that celebrates this beloved ingredient in grand style.
This remarkable recipe, adapted from the brilliant minds over at Liv Life, is nothing short of amazing! It masterfully combines multiple delectable textures and flavors into one irresistible, handheld bar. Imagine sinking your teeth into layers of classic Rice Krispie Treats infused with peanut butter, rich and creamy peanut butter fudge, more crisp Rice Krispie goodness, delightful mini peanut butter cups, and finally, a luscious layer of chocolate. It’s pure, unadulterated heaven for any peanut butter enthusiast! While these treats might require a little bit of love and attention in the kitchen, the effort is undeniably worth it. The best part? Absolutely NO baking is required! These decadent bars might not be your traditional Thanksgiving dessert, but they are absolutely perfect for a celebratory treat on the Friday after your Black Friday shopping spree, enjoyed alongside that leftover turkey sandwich. Or perhaps, they’re the much-needed sugar boost to fuel your early morning quest for those unbeatable holiday deals!
Peanut butter is more than just a spread; it’s a culinary foundation for countless sweet and savory dishes. Its rich, nutty flavor and creamy texture make it a beloved pantry staple worldwide. In this recipe, peanut butter takes center stage, appearing in multiple forms to create a symphony of flavor and texture. From the crispy, chewy base to the smooth, rich fudge, each component highlights a different facet of peanut butter’s charm, culminating in a dessert that’s both comforting and exciting. It’s a tribute to the simple joy and profound satisfaction that only peanut butter can bring.
The beauty of no-bake desserts lies in their simplicity and accessibility. They eliminate the need for an oven, making them perfect for busy holidays, hot summer days, or any time you crave a homemade treat without the fuss. This particular recipe stands out because it doesn’t compromise on flavor or complexity despite its no-bake nature. Instead, it builds layers of complementary tastes and textures, creating a dessert that feels incredibly gourmet yet remains delightfully easy to prepare. It’s a testament to how creative combinations can elevate everyday ingredients into something truly extraordinary.
Let’s delve deeper into the anatomy of these incredible bars. Each layer plays a crucial role in creating the ultimate peanut butter experience:
- The First Layer: Peanut Butter Rice Krispie Treats – This forms the foundational base, offering that quintessential crispy-chewy texture we all adore in Rice Krispie treats, but with an added depth of peanut butter flavor. It’s comforting, familiar, and the perfect start to this layered masterpiece.
- The Second Layer: Creamy Peanut Butter Fudge with Mini Peanut Butter Cups – This is where the indulgence truly begins. A rich, smooth, and decadent peanut butter fudge provides a melt-in-your-mouth experience. Scattered throughout are mini peanut butter cups, offering delightful pockets of intense chocolate and peanut butter flavor, adding a pleasant bite and an extra layer of sweetness.
- The Third Layer: Classic Rice Krispie Treats – To provide a subtle contrast and break up the intensity of the peanut butter fudge, a layer of traditional Rice Krispie treats is added. This layer is slightly less sweet and offers a pure, crispy texture, balancing the richness of the surrounding elements.
- The Fourth Layer: Chocolate Peanut Butter Topping – The grand finale! A silky-smooth blend of melted chocolate and peanut butter is poured over the top, creating a glossy, enticing finish. This chocolate layer hardens slightly when chilled, adding a satisfying snap before revealing the soft, chewy, and fudgy layers beneath. It’s the perfect capstone, marrying the two classic flavors in a harmonious embrace.
To ensure your Peanut Butter Lover’s Rice Krispie Treats turn out perfectly, here are a few expert tips:
- Proper Pan Preparation: Always line your 13×9 inch pan with parchment paper, leaving an overhang on the sides. This creates “handles” that make it incredibly easy to lift the entire slab out of the pan for clean, precise cutting. A light spray of cooking spray on the parchment can also help prevent sticking.
- Gentle Melting: When melting marshmallows and butter, whether in the microwave or on the stovetop, do so gently. Overheating marshmallows can make them hard and difficult to work with. Stir frequently until just melted and smooth.
- Even Spreading: For the Rice Krispie layers, avoid pressing them down too firmly into the pan. This can make them overly dense and hard. Instead, use a buttered spatula or wax paper to gently press them down into an even layer. For the fudge, ensure it’s spread smoothly and evenly to create a beautiful, consistent layer.
- Chilling is Key: Don’t rush the chilling process between layers. Allowing each layer to set properly ensures clean separation, firm structure, and makes the cutting process much easier. Rushing can result in messy bars that don’t hold their shape.
- Clean Cuts: Once the final chocolate layer has fully hardened, use a sharp, warm knife to cut your bars. Running the knife under hot water and wiping it clean between cuts will ensure neat, professional-looking squares or rectangles.
- Storage: Store these treats in an airtight container at room temperature for up to 3-4 days, or in the refrigerator for up to a week. If refrigerated, allow them to come to room temperature for about 10-15 minutes before serving for optimal texture.
These bars are incredibly versatile, allowing for creative adaptations to suit your taste:
- Peanut Butter Choice: While creamy peanut butter is recommended for smoothness, feel free to use crunchy peanut butter in the Rice Krispie layers for added texture. Just ensure it’s a smooth, stir-able type for the fudge layer.
- Chocolate Variations: Experiment with different types of chocolate for the top layer. Semi-sweet chocolate chips provide a classic balance, but milk chocolate will yield a sweeter topping, while dark chocolate will add a hint of delightful bitterness. You could even swirl in white chocolate for a marbled effect.
- Add-ins: For an extra crunch or flavor dimension, consider mixing in chopped roasted peanuts, pretzels, or even a sprinkle of sea salt to the top chocolate layer. Crushed potato chips could add a surprising sweet-and-salty twist to the Rice Krispie layers.
- Gluten-Free: Ensure your Rice Krispies cereal is certified gluten-free to make this a delicious option for those with dietary restrictions.
- Vegan Adaptation: With a few substitutions, this recipe can be made vegan-friendly. Use vegan marshmallows, plant-based butter (like Miyoko’s Kitchen or Earth Balance sticks), and ensure your chocolate chips are dairy-free.
These layered treats are truly perfect for any occasion where you want to bring a smile to people’s faces. They are a guaranteed crowd-pleaser at potlucks, birthday parties, or holiday gatherings. They also make an excellent addition to lunchboxes or a delightful afternoon pick-me-up. Pair them with a cold glass of milk, a warm cup of coffee, or even a scoop of vanilla ice cream for an extra special dessert experience.
Speaking of holidays and deals, do you usually participate in Black Friday shopping? What kind of deals do you look for, or do you prefer to relax at home with a comforting treat like these? Share your traditions in the comments below!

Peanut Butter Lover’s Rice Krispie Treats
Pin Recipe
Rate Recipe
Print Recipe
Ingredients
1st Layer: Peanut Butter Crispy Base
- 3 cups Rice Krispies cereal
- 1/2 bag miniature marshmallows (approx. 5 oz)
- 2 Tablespoons butter
- 1/3 cup creamy peanut butter
2nd Layer: Decadent Peanut Butter Fudge
- 1/2 cup butter
- 1/2 cup creamy peanut butter
- 1/2 teaspoon vanilla extract
- 1 1/2 cups powdered sugar, sifted
- 1 container Mini Peanut Butter Cups (approx. 8-10 oz), unwrapped
3rd Layer: Classic Crispy Topping
- 3 cups Rice Krispies cereal
- 1/2 bag miniature marshmallows (approx. 5 oz)
- 2 Tablespoons butter
4th Layer: Rich Chocolate Peanut Butter Topping
- 1 cup creamy peanut butter
- 1 bag chocolate chips (approx. 12 oz, semi-sweet or milk chocolate)
Instructions
-
Prepare a 13×9 inch baking pan by lining it with parchment paper, allowing some overhang on the sides for easy removal. Lightly spray the parchment with cooking spray.
-
For the 1st Layer: In a large microwave-safe bowl, combine the marshmallows, 2 tablespoons of butter, and 1/3 cup of creamy peanut butter. Microwave on high for about 1-2 minutes, stirring halfway through, until melted and smooth. Add the 3 cups of Rice Krispies cereal and stir until thoroughly coated. Press this mixture evenly into the prepared pan. Set aside.
-
For the 2nd Layer: In a separate large microwave-safe bowl, combine 1/2 cup of butter and 1/2 cup of creamy peanut butter. Cover loosely with plastic wrap. Microwave on high for 2 minutes, then stir, and microwave for another 1-2 minutes until completely melted and smooth. Be cautious when removing from the microwave as the mixture will be very hot. Stir in the vanilla extract and gradually add the 1 1/2 cups of powdered sugar, mixing until well combined and smooth, forming a thick fudge. Spread this peanut butter fudge evenly over the first Rice Krispie layer. Sprinkle the unwrapped mini peanut butter cups over the fudge, gently pressing them down slightly. Place the pan in the refrigerator for approximately 1 hour to allow the fudge to set and cool.
-
For the 3rd Layer: Once the peanut butter fudge layer is firm, prepare the second batch of Rice Krispie Treats. In a clean microwave-safe bowl, melt the remaining 1/2 bag of miniature marshmallows and 2 tablespoons of butter together. Microwave for 1-2 minutes until melted, stirring halfway through. Add the remaining 3 cups of Rice Krispies cereal and stir until evenly coated.
-
Gently but firmly press this second Rice Krispie mixture onto the cooled fudge layer. Use a buttered spatula or your hands (lightly buttered) to prevent sticking and ensure an even layer.
-
For the 4th Layer (Chocolate Topping): In another microwave-safe bowl, combine 1 cup of creamy peanut butter and the entire bag of chocolate chips. Microwave in 45-second intervals, stirring thoroughly after each interval, until the mixture is completely melted and smooth. Pour this rich chocolate-peanut butter topping over the top Rice Krispie layer. Gently shake the pan slightly to help distribute the melted chocolate mixture evenly across the surface.
-
Return the pan to the refrigerator for approximately 30 minutes, or until the chocolate topping has fully hardened and set. Once completely cooled and firm, use the parchment paper overhang to lift the entire block of treats from the pan. Place on a cutting board and cut into desired bar sizes using a sharp, warm knife. Serve and enjoy!
Notes
Nutrition
Nutrition information is automatically calculated and should only be used as an approximation. It may vary based on specific brands and ingredient variations.
Additional Information
Loved this recipe? Share your thoughts and leave a comment below!
