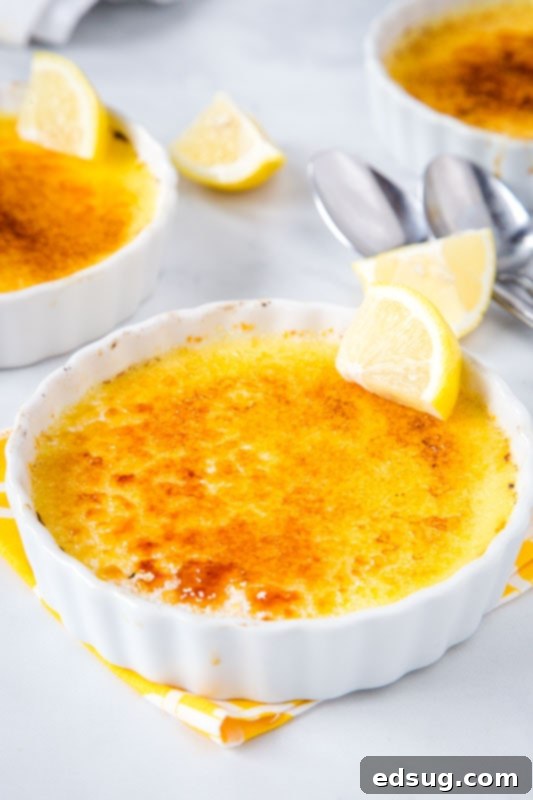
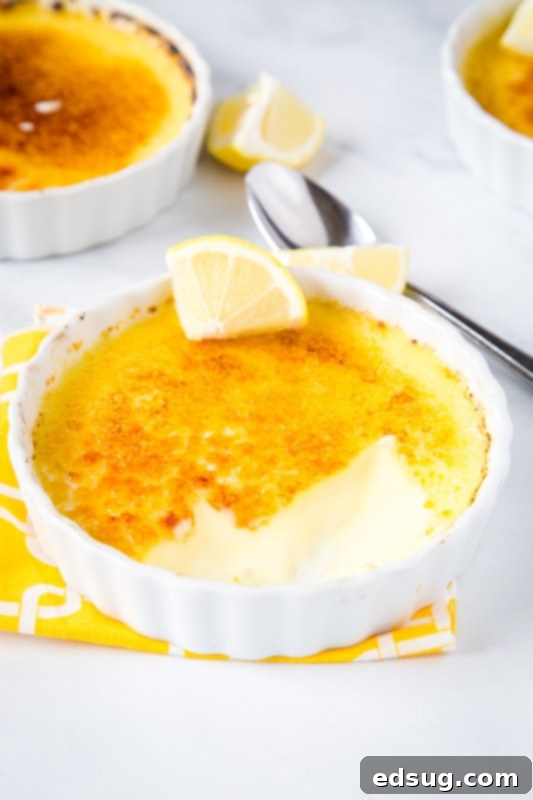
Ultimate Lemon Crème Brûlée: A Zesty & Elegant Dessert Recipe
When you envision a show-stopping dessert that graces the menus of upscale restaurants, crème brûlée undoubtedly comes to mind. Its elegant appearance and crisp caramelized sugar topping often lead people to believe it’s an impossible feat to recreate at home. However, nothing could be further from the truth! This classic French custard dessert is surprisingly simple to master, and with a touch of bright lemon, it transforms into an unforgettable culinary experience.
Crème brûlée, meaning “burnt cream” in French, is a timeless dessert celebrated for its smooth, rich custard base crowned with a delicate, crunchy layer of caramelized sugar. While traditional vanilla crème brûlée is always a delight, the versatility of this dessert allows for endless flavor explorations. From luscious chocolate to exotic green tea, or vibrant raspberry, the possibilities are only limited by your imagination. Recently, I had the pleasure of tasting a lemon-flavored variety, and I was instantly captivated. The bright, fresh notes from both lemon juice and zest elevate the creamy custard, creating a dessert that is both refreshing and indulgent. If you’re a fan of citrus desserts, this Lemon Crème Brûlée is an absolute must-try!

Essential Equipment for Crème Brûlée Perfection
Before diving into the recipe, let’s talk about the tools you’ll need. While some equipment is standard kitchen fare, a few items are particularly helpful for achieving that restaurant-quality finish. The most iconic part of crème brûlée is undoubtedly its perfectly brittle, caramelized sugar topping, achieved with a kitchen torch. These torches are relatively inexpensive, often found for around $15, and they make the caramelization process quick and effortless. However, don’t despair if you don’t own one! There are excellent alternatives to achieve that signature crust.
No Kitchen Torch? No Problem! Alternative Caramelization Methods
While a kitchen torch offers the most control and even caramelization, you can still achieve a fantastic sugary crust using common kitchen appliances. Here are two effective methods:
- Using Your Broiler: This is the most popular alternative. Preheat your broiler to high. Place your chilled ramekins with the sugar sprinkled on top on a baking sheet. Carefully place the baking sheet under the broiler. Keep a very close eye on them, as sugar can burn quickly. The caramelization process usually takes only 1-3 minutes. Rotate the baking sheet if necessary for even browning. Once the sugar is deeply golden brown and bubbly, remove the ramekins immediately.
- The Hot Metal Spoon Method: This traditional, albeit more artisanal, method requires a bit more care. Find an old metal spoon (one you don’t mind potentially scorching slightly). Heat the back of the spoon directly over an open flame (like a gas stove burner) until it’s very hot. Using an oven mitt or thick towel to protect your hand, carefully touch the hot spoon to the sugar layer on top of the custard. The sugar will melt and caramelize on contact. Repeat this process, heating the spoon between each touch, until the entire surface is caramelized. This method gives a rustic, uneven brûlée, which some prefer.
Regardless of the method you choose, the key is to work quickly and ensure the sugar layer is thin and even. Over-caramelization can lead to a bitter taste, so watch it closely!

Crafting the Perfect Lemon Crème Brûlée Custard
My husband has always considered traditional Crème Brûlée his ultimate favorite dessert. Knowing this, I was eager to create a lemon-infused version that would capture the same magic but with a refreshing citrus twist. The result could not have been more perfect! While there are a few distinct steps involved, each one is straightforward and manageable, making this an accessible recipe for home bakers of all skill levels. With just a handful of high-quality ingredients, you’ll be amazed at the exquisite results you can achieve.
The beauty of crème brûlée lies in its simplicity. The core ingredients – heavy cream, egg yolks, sugar, and flavorings – combine to form a luxurious custard that is baked gently in a water bath. This gentle baking method, known as a bain-marie, is crucial for achieving the silky-smooth, uniform texture characteristic of a perfect crème brûlée. It prevents the edges from setting too quickly and ensures the custard cooks evenly without curdling or developing air bubbles. The addition of fresh lemon zest and juice introduces a vibrant acidity that cuts through the richness of the cream, creating a beautifully balanced flavor profile that is both decadent and refreshing.
Step-by-Step Guide: How To Make Lemon Crème Brûlée
Follow these detailed instructions to create an exquisite Lemon Crème Brûlée that will impress everyone.
- Prepare Your Baking Setup: Preheat your oven to 300°F (150°C). Arrange 8 oven-safe ramekins (typically 4-ounce to 6-ounce capacity) in a large, deep baking dish or roasting pan. Placing a clean washcloth or a silicone mat at the bottom of the pan before arranging the ramekins can prevent them from sliding around during baking and transport.
- Infuse the Cream: In a medium saucepan, combine the heavy cream, granulated sugar, fresh lemon zest (from 2 lemons), and a pinch of salt. Heat this mixture over medium heat, stirring occasionally, until it just barely reaches a simmer. You’ll see small bubbles forming around the edges, but do not let it come to a rolling boil. The goal here is to warm the cream, dissolve the sugar, and infuse it with the aromatic lemon zest.
- Whisk the Egg Yolks: While the cream is heating, separate 12 egg yolks into a large bowl. Discard the whites or save them for another recipe (like meringues!). Whisk the egg yolks vigorously until they are smooth, uniformly pale yellow, and slightly thickened. This aeration helps create a lighter, silkier custard.
- Temper the Egg Yolks: This is a critical step to prevent the eggs from scrambling. Once the cream mixture is hot, slowly and gradually whisk about 1 cup of the hot cream into the beaten egg yolks. Continue whisking constantly to slowly raise the temperature of the yolks without cooking them. Repeat this process with another cup of the hot cream. Once two cups of cream are incorporated, you can then add the entire egg yolk mixture back into the remaining hot cream in the saucepan, whisking continuously until everything is thoroughly combined and smooth.
- Add Flavor Extracts: Stir in the vanilla extract and lemon extract (if using) into the custard mixture. These extracts enhance the overall flavor, adding depth and a more pronounced lemon profile.
- Strain for Silky Smoothness: Pour the entire custard mixture through a fine-mesh strainer into a clean large bowl or a liquid measuring cup with a spout. This step is essential for achieving a perfectly smooth and luxurious custard by removing any cooked egg bits, lemon zest pieces, or other impurities. Discard any solids left in the strainer.
- Fill the Ramekins: Carefully divide the strained custard mixture evenly among the 8 prepared ramekins. Place the baking dish containing the filled ramekins into the center of your preheated oven.
- Create a Water Bath (Bain-Marie): With the baking dish in the oven, carefully pour hot (preferably boiling) water into the baking dish, taking care not to splash any water into the ramekins themselves. The water level should reach approximately two-thirds of the way up the sides of the ramekins. The water bath ensures that the custard bakes gently and evenly, preventing it from cracking or curdling.
- Bake to Perfection: Bake for 30-35 minutes. Baking time can vary depending on the size and depth of your ramekins and your oven’s calibration. The custards are done when the edges are set, but the centers still have a slight jiggle, similar to very firm gelatin. An instant-read thermometer inserted into the center of a custard (without touching the bottom) should register 180°F (82°C).
- Cool and Chill: Once baked, carefully remove the baking dish from the oven. Using tongs or oven mitts, carefully transfer the hot ramekins from the water bath to a wire rack to cool completely at room temperature for at least 2 hours. Once cooled, cover each ramekin tightly with plastic wrap and refrigerate for a minimum of 4-6 hours, or preferably overnight, until thoroughly chilled and set. This chilling period is crucial for the custard to firm up and for the flavors to fully develop.
- Caramelize Before Serving: When you’re ready to serve, remove the chilled ramekins from the refrigerator. Blot any condensation from the top with a paper towel. Sprinkle approximately 1 to 1½ teaspoons of granulated sugar evenly over the surface of each custard. Rotate the ramekin gently to distribute the sugar into an even, thin layer.
- Torch or Broil: Ignite your kitchen torch and caramelize the sugar. Move the flame slowly and evenly across the sugar until it melts, bubbles, and turns a rich amber color. If using the broiler method, follow the instructions provided in the “No Kitchen Torch?” section above.
- Optional Re-chill: For the ultimate contrast in texture and temperature, I like to re-chill the brûléed custards for an additional 20-30 minutes in the refrigerator before serving. This ensures the custard remains cold and creamy while the caramelized sugar topping is crisp and cool.

Expert Tips for Crème Brûlée Success
- Use Fresh Ingredients: The quality of your ingredients directly impacts the final taste. Use fresh, high-fat heavy cream and fresh eggs for the best flavor and texture.
- Don’t Overcook: Overcooked custard can become grainy or curdled. The slight jiggle in the center is exactly what you want. It will continue to set as it cools.
- Even Sugar Layer: For the best caramelization, ensure the sugar layer before torching/broiling is thin and even. Too much sugar will create a thick, hard-to-crack layer, while an uneven layer will result in patchy caramelization.
- Chill Thoroughly: Adequate chilling time is crucial. It allows the custard to fully set and develops the deep flavors. Resist the urge to rush this step!
- Make Ahead: Crème brûlée is an excellent make-ahead dessert. You can prepare the custard and chill it for up to 3 days in advance. Only caramelize the sugar right before serving to maintain that perfect crispness.
This Lemon Crème Brûlée recipe is more than just a dessert; it’s a culinary triumph that everyone will rave about. Its impressive presentation belies its straightforward preparation. The best part? You can prepare the custards well in advance, leaving only the dramatic torching for just before serving. This makes it an ideal dessert for entertaining, allowing you to “show off” your torching skills to friends and family without last-minute stress. Serve them individually, and watch as your guests delight in cracking through that golden, glassy sugar crust to reveal the smooth, zesty custard beneath.
More Irresistible Lemon Dessert Recipes
If you’ve fallen in love with the vibrant taste of lemon in this crème brûlée, you’ll be thrilled to explore other delightful lemon-infused treats. Lemon brings a refreshing zest and a perfect balance to a wide array of desserts. Here are some more of my favorite lemon recipes that are sure to brighten your day:
- Lemon Ricotta Pound Cake: A tender, moist cake with a delicate lemon flavor and a rich texture from ricotta.
- Creamy Lemon Mousse: Light, airy, and bursting with fresh lemon, this mousse is an elegant and refreshing treat.
- Lemon Crinkle Cookies: Soft, chewy cookies with a beautiful crinkled surface and a tangy lemon punch.
- No Bake Lemon Cheesecake: A simple yet satisfying dessert that requires no oven, perfect for warm weather.
- Classic Lemon Bars: A timeless favorite featuring a buttery shortbread crust topped with a sweet and tart lemon filling.
- Lemon Dessert Lasagna: Layered with goodness, this dessert combines a buttery crust, creamy lemon filling, and whipped topping.
- Lemon Loaf Cake: A moist and flavorful loaf cake drizzled with a sweet lemon glaze, ideal for breakfast or dessert.


★
★
★
★
Lemon Crème Brûlée Recipe
Rate Recipe
Print Recipe
Ingredients
- 4 cups heavy cream
- 2/3 cups granulated sugar (for custard)
- Zest from 2 lemons
- ¼ teaspoon salt
- 12 egg yolks
- 1 teaspoon vanilla extract
- 1/2 teaspoon lemon extract (optional, for intensified lemon flavor)
- 8-12 teaspoons granulated sugar (for topping, approx. 1-1.5 tsp per ramekin)
- Hot water (for water bath)
Instructions
-
Preheat oven to 300º F (150°C).
-
Arrange 8 ramekins in a large baking dish or roasting pan. Consider placing a washcloth in the bottom of the pan to prevent movement.
-
In a saucepan, combine 4 cups heavy cream, 2/3 cups granulated sugar, zest from 2 lemons, and ¼ teaspoon salt. Heat over medium heat until it just reaches a simmer, stirring to dissolve sugar. Do not boil.
-
Meanwhile, in a large bowl, whisk 12 egg yolks until smooth and uniformly pale in color.
-
Slowly whisk about 1 cup of the hot cream mixture into the egg yolks until combined. Repeat with another 1 cup of cream. Then, pour the egg yolk mixture back into the remaining cream in the saucepan, whisking continuously until smooth and well blended. This tempering step prevents the eggs from scrambling.
-
Stir in 1 teaspoon vanilla extract and 1/2 teaspoon lemon extract (if using).
-
Strain the cream mixture through a fine-mesh strainer into a large bowl or liquid measuring cup. Discard any solids from the strainer.
-
Divide the strained mixture evenly into the 8 ramekins. Place the baking dish with the filled ramekins into the center of your oven.
-
Carefully pour hot (or boiling) water into the baking dish, ensuring the water comes about 2/3rds of the way up the sides of the ramekins. Be very careful not to get any water into the custard mixture.
-
Bake for 30-35 minutes, or until the edges are set and the centers barely jiggle. An instant-read thermometer should read 180°F (82°C).
-
Remove the baking dish from the oven. Carefully transfer the ramekins to a wire rack to cool completely at room temperature for about 2 hours. Once cooled, cover each ramekin tightly with plastic wrap and refrigerate for 4-6 hours, or overnight, until thoroughly chilled and firm.
-
When ready to serve, uncover the chilled custards. Blot any condensation from the top with a paper towel. Sprinkle about 1 to 1½ teaspoons of granulated sugar evenly over the top of each ramekin.
-
Using a kitchen torch, caramelize the sugar until it is golden brown and bubbly. Alternatively, use the broiler method described in the notes or article body.
-
For best results, re-chill the brûléed custards for 20-30 minutes before serving, ensuring the custard remains perfectly cold. Serve immediately after re-chilling.
Notes
Broiler Method: If you don’t have a kitchen torch, preheat your broiler to high. Place sugared ramekins on a baking sheet under the broiler. Watch constantly! The sugar will caramelize in 1-3 minutes. Remove as soon as it’s golden brown to prevent burning.
Make Ahead: Custards can be made and refrigerated for up to 3 days. Only caramelize the sugar just before serving.
Nutrition
Carbohydrates: 25g |
Protein: 8g |
Fat: 50g |
Saturated Fat: 30g |
Polyunsaturated Fat: 3g |
Monounsaturated Fat: 14g |
Cholesterol: 426mg |
Sodium: 118mg |
Potassium: 144mg |
Sugar: 24g |
Vitamin A: 2139IU |
Vitamin C: 1mg |
Calcium: 114mg |
Iron: 1mg
Nutrition information is automatically calculated, so should only be used as an approximation.
Additional Info
I’ve created a fun and engaging community group on Facebook, and I’d be absolutely delighted for you to join us! It’s the perfect place to share your favorite recipes, ask any cooking questions you might have, and stay updated on all the new and exciting recipes from Dinners, Dishes and Desserts. Never miss out on a delicious new creation!
Be sure to follow me on Instagram and tag #dinnersdishes so I can see all the wonderful DINNERS, DISHES, AND DESSERTS recipes YOU create!
Stay connected and never miss a post by following me on my social media channels:
Facebook |
Twitter |
Pinterest |
Instagram
